 Linux on VIA Epia Hardware [] Linux on VIA Epia Hardware []
|

|
|
|
|
|
|
|
|
|
|
|
|
|
|
|
|
|
|
|
|
|
|
|
|
|
|
|
|
|
|
|
|
|
|
|
|
|
|
|
|
|
|
|
|
|
|
|
|
|
|
|
|
|
|
|
|
|
|
|
|
|
|
|
|
|
|
|

|
Answers
|
|
|
| | |
|
|
|
| |
|
The 2.6.13 kernel requires an updated vt1211 driver. Using an old vt1211 driver gives
a kernel "Oops" when sysfs files are accessed to monitor the hw.
A patch for 2.6.13 is available at http://hem.bredband.net/ekmlar/linux-2.6.13-vt1211.patch.txt
or attached to this FAQ here.
This patch is to be applied to a plain-kernel 2.6.13.
You'll find more informations on that page...
you can alternatively also grab a copy of the plain vt1211.c file -
The driver can be built manually with:
 echo "obj-m := vt1211.o" > Makefile
 make -C /path/to/your/kernel2.6/source/dir SUBDIRS=$PWD modules
The patch also works with kernel 2.6.13.2.
|
|
Entered by smurphy on Tuesday, 20 September 2005 @ 23:52:42
|
|
Linux on VIA Epia Hardware - Common Linux problems, # Hits: 118964
|
 [ 34,161 bytes - text/plain ] [ 34,161 bytes - text/plain ]
[ 30,614 bytes - text/x-csrc ]
|

|
|
|
|
|
|
| |
|
This one took me some time to find out.
LinuxBIOS v2 contains a flash utility called "flash_rom". It can be found under LinuxBIOS - in the package under freebios2/util/flash_and_burn.
This utility can be used to flash the bios instead of awdflash.
# ./flash_rom --help
The arguments are:
usage: ./flash_rom [-rwv] [-c chipname] [-s exclude_start] [-e exclude_end] [file]
-r: read flash and save into file
-w: write file into flash (default when file is specified)
-v: verify flash against file
-c: probe only for specified flash chip
-s: exclude start position
-e: exclude end postion
 If no file is specified, then all that happens
 is that flash info is dumped
A tipical flash-session would be:
./flash_rom -r test.bin
The arguments are:
-r
test.bin
Calibrating timer since microsleep sucks ... takes a second
Setting up microsecond timing loop
260M loops per second
OK, calibrated, now do the deed
Enabling flash write on VT8235...OK
Trying Am29F040B, 512 KB
probe_29f040b: id1 0x24, id2 0xa6
Trying At29C040A, 512 KB
probe_jedec: id1 0xbf, id2 0xb6
Trying Mx29f002, 256 KB
probe_29f002: id1 0xbf, id2 0xb6
Trying SST29EE020A, 256 KB
probe_jedec: id1 0xbf, id2 0xb6
Trying SST28SF040A, 512 KB
probe_28sf040: id1 0x24, id2 0xa6
Trying SST39SF020A, 256 KB
probe_jedec: id1 0xbf, id2 0xb6
SST39SF020A found at physical address: 0xfffc0000
Part is SST39SF020A
Reading Flash...done
Get the new Bios - and burn it with:
# ./flash_rom -w epiam_116_fixed.bin
The arguments are:
-w
epiam_116_fixed.bin
Calibrating timer since microsleep sucks ... takes a second
Setting up microsecond timing loop
252M loops per second
OK, calibrated, now do the deed
Enabling flash write on VT8235...OK
Trying Am29F040B, 512 KB
probe_29f040b: id1 0x24, id2 0xa6
Trying At29C040A, 512 KB
probe_jedec: id1 0xbf, id2 0xb6
Trying Mx29f002, 256 KB
probe_29f002: id1 0xbf, id2 0xb6
Trying SST29EE020A, 256 KB
probe_jedec: id1 0xbf, id2 0xb6
Trying SST28SF040A, 512 KB
probe_28sf040: id1 0x24, id2 0xa6
Trying SST39SF020A, 256 KB
probe_jedec: id1 0xbf, id2 0xb6
SST39SF020A found at physical address: 0xfffc0000
Part is SST39SF020A
Programming Page: 0063 at address: 0x0003f000
You should then reread the installed bios from Flash - and compare it against the one you have just uploaded using:
diff <newfile> <oldfile>
There should be no difference between the files !
|
|
Entered by smurphy on Saturday, 18 August 2007 @ 23:57:58
|
|
Linux on VIA Epia Hardware - Epia M10000 / Hush, # Hits: 99338
|
|
|
|
|
|
|
| |
|
First of all - I had most problems due to a not working firmware. So try out different versions of Firmware. The one working for me can be found here. Find other firmware links and more documentation under the SpeedLink page.
Also - it is very difficult to actually find decent informations. I found some kind Help on the conexant Maillinglist
Please Note that this FAQ refers to setting up a Link in Germay - using a Annex-B module, however it should also be valid for other Annex-Modules.
Also - as you are installing a quite complex hardware on a complex system - I assume you know how to patch/compile/install kernels and configure a ppp-link - and won't go into details here.
So - let's go for it. Download the conexant usbatm patches for the 2.6.14.x kernels on the project page. Unpack these into the right kernel-source directory:
cd /usr/src/linux
tar jxf ~/usbatm-20050216.tar.bz2
drivers/usb/atm/cxacru.c
drivers/usb/atm/Kbuild
drivers/usb/atm/Kconfig
drivers/usb/atm/usbatm.c
drivers/usb/atm/usbatm.h
Kernels 2.6.14.5 and higher already have the conexant drivers - so don't apply the patch if you use a newer version.
Configure the kernel to have support for the Conexant Chipset.
Device Driver -> Networking Support -> Networking Options ->
 Asynchronous Transfer Mode (ATM) (EXPERIMENTAL)
 Classical IP over ATM (EXPERIMENTAL)
[*] Do NOT send ICMP if no neighbour (EXPERIMENTAL)
 LAN Emulation (LANE) support (EXPERIMENTAL)
 Multi-Protocol Over ATM (MPOA) support (EXPERIMENTAL)
 RFC1483/2684 Bridged protocols
[*] Per-VC IP filter kludge

Device Driver -> USB Support ->
 Support for USB
......
---   USB Host Controller Drivers
   EHCI HCD (USB 2.0) support
[ ]     Full speed ISO transactions (EXPERIMENTAL)
[ ]     Root Hub Transaction Translators (EXPERIMENTAL)
   OHCI HCD support
   UHCI HCD (most Intel and VIA) support
 Connexant Accessrunner USB support
B.e. you can use the following kernel-config for a 2.6.12.x kernel. Copy that file into your kernel-source root directory and perform a make oldconfig. Compile and install the kernel and the modules.
The Firmware is kind of the most tricky part. For this -
download the firmware extracter, and compile it
cd /usr/src
mkdir fw-extract
cd fw-extract
wget http://www.elektrorevue.cz/clanky/05041/cxacru-fw-ng.tar.gz
tar xzf cxacru-fw-ng.tar.gz
make
You can also get a local copy of the firmware extractor attached to this FAQ, then download & extract the latest firmware
wget http://www.atlantis-land.com/firmware/1863_DriverWinMultiV099.085WAN.zip
unzip 1863_DriverWinMultiV099.085WAN.zip
mkdir -p /usr/local/lib/firmware
./cxacru-fw CnxEtU.sys /usr/local/lib/firmware/cxacru-fw.bin
as a backup option - check out the latest copy I found - find it in the
download section of this site.
Alternatively - take the already extracted Firmware suitable for Linux linked to this site here.
After that - find out where your hotplug system looks for firmware. Mine checks under /usr/lib/hotplug/firmware - and that's where I'll copy the firmware.
cp cxacru-fw.bin /usr/lib/hotplug/firmware
This done reboot your system and check you have informations about your modem. The following message should show up during the boot process:
device class 'firmware': registering
bus usb: add driver cxacru
bound device '2-2:1.0' to driver 'cxacru'
usbcore: registered new driver cxacru
usb 1-1: new full speed USB device using uhci_hcd and address 3
cxacru 2-2:1.0: found firmware cxacru-fw.bin
cxacru 2-2:1.0: ADSL line: attemtping to activate
cxacru 2-2:1.0: ADSL line: down
cxacru 2-2:1.0: ADSL line: attemtping to activate
cxacru 2-2:1.0: ADSL line: channel analysis
cxacru 2-2:1.0: ADSL line: up (7168 kb/s down | 640 kb/s up)
Checking the proc-filesystem for the proper devices to exist - you should find:
cat /proc/net/atm/cxacru:0
ADSL USB MODEM (usb-0000:00:07.3-2)
MAC: 00:05:b4:12:57:68
AAL5: tx 38291 ( 0 err ), rx 58395 ( 0 err, 0 drop )
Line up
This shows - the modem is up and has a Link. Now - as I'm using PPPoE - I need to make sure the right modules are loaded for the br2684 module which enables a bridging connection with br2684ctl to run PPPoE over ATM.
modprobe br2684
Make sure it is loaded at boot-time. On a Debian-System - add the line to the file /etc/modules
echo br2684 >> /etc/modules
Install the br2684ctl tools. Under debian:
apt-get install br2684ctl
will do the trick. Find out what VPI/VCI your provider is using. In Germany - it's VPI=1 and VCI=32 at 1&1. To activate it - I wrote the following little script br2684_up.sh:
#!/bin/sh

PATH=/usr/local/sbin:/usr/sbin:/sbin:/usr/local/bin:/usr/bin:/bin
export PATH

 # Build a little while loop - to check if the conexant modem
 # has a ADSL Line up
 count=0
 while [ $count -lt 40 ]
 do
   sync=`cat /proc/net/atm/cxacru:0 | grep 'Line up'`
   [ "$sync" = "Line up" ] && break
   sleep 1
   count=$((1+$count))
 done

if [ "$sync" = "Line up" ]
 then
  br2684ctl -b -c 0 -a 1.32
  sleep 3
  ifconfig nas0 172.16.2.6 netmask 255.255.255.248
fi
The while loop waits at least 40seconds until the cxacru-driver has synced to the telco - after that it will set up the bridge-interface to the ATM-device - which can be used by the pppd daemon.
Using the following file in /etc/ppp/peers/dsl-connection
noipdefault
defaultroute
user "UserName@domain.de"
noauth
updetach
usepeerdns
plugin rp-pppoe.so
nas0

hide-password
# Override any connect script that may have been set in /etc/ppp/options.
persist
mtu 1492

# RFC 2516, paragraph 7 mandates that the following options MUST NOT be
# requested and MUST be rejected if requested by the peer:
# Address-and-Control-Field-Compression (ACFC)
noaccomp
# Asynchronous-Control-Character-Map (ACCM)
default-asyncmap
I can call the connection using: pppd call dsl-connection
Note that you'll have to configure quite more stuff, especially to make the connection come up at boot time. On my debian system - I have copied the br2684_up.sh script to /etc/ppp, configured the ppp-connection using the pppoeconf package - and adapted the /etc/network/interface file to reflect the correct pppd-call. Make sure the br2684ctl is loaded at boot before the ppp is started.
auto dsl-connection
iface dsl-connection inet ppp
     provider dsl-connection
     pre-up /etc/ppp/br2684_up.sh
# please do not modify the following line
     pre-up /sbin/ifconfig nas0 up # line maintained by pppoeconf
|
|
Entered by smurphy on Sunday, 19 August 2007 @ 00:01:54
|
|
Linux on VIA Epia Hardware - CV860A / Lex Light, # Hits: 99238
|
|
|
|
|
|
|
| |
|
Usually, you would use the Flitedeck utility from VIA. However - this one is deprecated, and won't work on the new plattform.
The problem with the Hush-PC is that it has no Floppy drive connected to it. If you try a USB-Floppy drive, it won't work either - the awdflash utility will deactivate all USB stuff _before_ reading the new BIOS in - thus cutting the tree it's sitting on.
Solution: Burn a Bootable CD-rom. for this -you need a Floppy-bootdisk image. With a Cd-Writing utility - copy all DOS-Files onto the CD, add the awdflash.exe utility and the new BIOS.bin file on it. Then go to the next step to add the bootable Image (Use the Floppy-Image) and you're done.
Boot from the CD - and once done - type in the following command:
awdflash.exe BIOS.bin /py/sn/cd/cp/tiny
and you should be done. Note that this should work with future and old versions of BIOS's.
|
|
Entered by smurphy on Saturday, 18 August 2007 @ 23:57:58
|
|
Linux on VIA Epia Hardware - Epia M10000 / Hush, # Hits: 97698
|
|
|
|
|
|
|
| |
|
Get the newest snapshot from the CVS repository under:
http://at76c503a.berlios.de/cvs.html
Unpack the archive in /usr/src/ - assuming you have already compiled the kernel version 2.6.12.4-EpiaV (Adapted in the Makefile of the kernel-source directory)
tar xzvf at76c503a-cvsroot.tar.gz
mv at76c503a CVS
cvs -d `pwd`/CVS co at76c503a
cd at76c503a
make KERNEL_VERSION=2.6.12.4-EpiaV
make KERNEL_VERSION=2.6.12.4-EpiaV install
/sbin/depmod -ae -F System.map  2.6.12.4-EpiaV
Note that you don' t need to specify all kernel-related version stuff when already running the kernel you compiled the driver against.
I have found out that there are several Firmware Versions available for this WLan Module - and I still don't know where I got the latest version - but in case someone looks for it - check it out firmware version 1.103.2 #175.
Please note that I tested it with USB device ID: 03eb:7605 only.
Note that some people have reported version 1.103.2 not to work on their hardware. In that case - use firmware version 1.101.0 #84. This version seems to work almost everywhere.
|
|
Entered by smurphy on Sunday, 19 August 2007 @ 00:01:53
|
|
Linux on VIA Epia Hardware - CV860A / Lex Light, # Hits: 97100
|
|
|
|
|
|
|
| |
|
Actually - the lm_sensors 2.7.x package performs a quite good identification of the existing hardware. On my system - the following modules need to be loaded using a 2.6.12 kernel - in the /etc/sysconfig/lm_sensors:
MODULE_0=i2c-viapro
MODULE_1=i2c-isa
MODULE_3=eeprom
MODULE_4=via686a
Make sure you use the ISA Bus, as the SMBus uses the lm80 Chip/Module which provides only Junk data.
Also - the /etc/sensors.conf file looks like this:
chip "via686a-*"
    label "1.5V" "CPU core"
    label "2.5V" "+2.5V"
    label "3.3V" "I/O"
    label "5.0V" "+5.0V"
    label "12V" "+12V"
    ignore fan1  #"CPU Fan"
    ignore fan2  #"P/S Fan"
    label temp1 "CPU Temp"
    label temp2 "SYS Temp"
    ignore temp3 #"SBr Temp"
    set temp1_hyst 50
    set temp1_over 55
    set temp2_hyst 55
    set temp2_over 60
    set temp3_hyst 60
    set temp3_over 65
That provides me decent data on the System. Note that the mini-ITX-Lex system is passive cooled - so no FANs.
After creating the sensors.conf file - run "sensors -s" and you should be done.
|
|
Entered by smurphy on Sunday, 19 August 2007 @ 00:01:52
|
|
Linux on VIA Epia Hardware - CV860A / Lex Light, # Hits: 97057
|
[ 64,986 bytes - text/plain ]
|
|
|
|
|
|
| |
|
This results from the Fact that TV-Out has a maximum resolution of 1024x768 using the CLE266 Overlay Capabilities. So - in case you're using the Frame-Buffer device to run X-Windows, make sure in the BIOS you deactivate the TV Out in the CMOS-Setup, Advanced Chipset Features/Select Display Device - just use CRT.
|
|
Entered by smurphy on Saturday, 18 August 2007 @ 23:57:58
|
|
Linux on VIA Epia Hardware - Epia M10000 / Hush, # Hits: 96834
|
|
|
|
|
|
| |
|
The Lex 860A EPIA 5000 board uses the 533MHz C3 CPU. By loading the longhaul module - you can throttle the CPU. Note that it became stable with kernel 2.6.11.11 only on my system.
So - all you need to do is enable the longhaul by loading the longhaul module:
modprobe longhaul
Check using the dmesg command to see if it loaded correctly.
If this works - make sure the longhaul module gets loaded at every boot. For this - just add "longhaul" and "cpufreq_powersave" into the /etc/modules file.
Using the longhaul stuff - make sure you use under a 2.6.12.4 kernel-module (as configured in config-2.6.12.4) with the userspace-governor eabled by default - then change to:
# cd /sys/devices/system/cpu/cpu0/cpufreq
cpufreq # ls
affected_cpus
scaling_available_frequencies
scaling_governor
cpuinfo_cur_freq
scaling_available_governors
scaling_max_freq
cpuinfo_max_freq
scaling_cur_freq
scaling_min_freq
cpuinfo_min_freq
scaling_driver
scaling_setspeed
cpufreq # modprobe cpufreq_powersave
cpufreq # cat scaling_available_governors
powersave userspace
echo powersave > scaling_governor
cpufreq # cat scaling_cur_freq
399000
That's it ...
|
|
Entered by smurphy on Sunday, 19 August 2007 @ 00:01:52
|
|
Linux on VIA Epia Hardware - CV860A / Lex Light, # Hits: 96788
|
|
|
|
|
|
| |
|
Actually - what you see is the noise of many things going on on your system - it mostly happens on Harddisk Accesses, Sound-card playing music, Strong Network-Transfers etc.
- It has something to do with the Powerunit/Mass connection and the connection between the Screen and the Onboard graphic card
- Once you make sure the Case and the Mass of your Board is connected to the Generall Mass (in Germany it's called "Erdung"), this noise apparitions go away on your Screen
- It can also have something to do with the Powerunit not beeing strong enough - so you can try out a stronger Powerunit to see if it solves the problem
|
|
Entered by smurphy on Saturday, 18 August 2007 @ 23:57:58
|
|
Linux on VIA Epia Hardware - Epia M10000 / Hush, # Hits: 96756
|
|
|
|
|
|
| |
|
This is most probably due to the fact that you're using the wrong Sampling speed. It avered to work correctly when using the alsa-Drivers 0.9.x with x > 4 and 1.0.x with x < 2- but you'll have to recompile these. Under Mandrake however - these will only compile if you deactivate the verbose-printk stuff.
In the Alsa-Driver directory, compile it using:
./configure --disable-verbose-printk && make && make install
or you'll get unresolved dependencies. Once this is done, make sure the alsa drivers are loaded using dxs_support=3. In the /etc/modules.conf - this will look like:
# Sound Stuff
above snd-via82xx snd-pcm-oss
alias sound-slot-0 snd-via82xx
options snd-via82xx dxs_support=3
And it should work :)
|
|
Entered by smurphy on Saturday, 18 August 2007 @ 23:57:58
|
|
Linux on VIA Epia Hardware - Epia M10000 / Hush, # Hits: 96748
|
[ 1,251 bytes - text/plain ]
|
|
|
|
|
|
| |
|
First of all - you need to realize that the CV860A has a Via C3 Ezra CPU which is a 486 Based CPU, with some Pentium extension. So most things will work.
The Installation will make no problems - however - as soon as you reboot the System - it will crash badly - especially if you have a USB Wireless Lancard using the Amtel Chipset (this was my case).
I found out - that the usb subsystem was the cause of the problems - so deactivating it on boot appending: nousb
to the lilo-command line - did the trick. What was required to do - was to deactivate the usb-uhci driver loading if the modules for the Wireless Interface was to be loaded (Which was the cause of the problem) and use the uhci module. Do this with changing the probeall USB line in the etc/modules.conf file to:
# Wireless Lan stuff
probeall usb-interface uhci
post-install usbvnetr /bin/fastvnet.sh
This will fix the Crash.
|
|
Entered by smurphy on Sunday, 19 August 2007 @ 00:01:52
|
|
Linux on VIA Epia Hardware - CV860A / Lex Light, # Hits: 96710
|
|
|
|
|
|
| |
|
Mandrake has the correct lm_sensors version in - however - the sensors_detect perl-script needs to be updated to find the correct chip. You can get that script here:
http://www2.lm-sensors.nu/~lm78/cvs/lm_sensors2/prog/detect/sensors-detect
A local copy is attached to this FAQ entry.
Once run - you need to make sure that the following modules are loaded through /etc/sysconfig/lm_sensors
MODULE_0=i2c-viapro
MODULE_1=i2c-isa
MODULE_2=eeprom
MODULE_3=vt1211
After that - adapt the /etc/sensors.conf file - Check mine in the related files section of this FAQ. Note that the Mini-ITC Nemiah M10000 seem to have only one temperature sensor. All others give back Junk.
Check the entire setup by starting it through
/etc/rc.d/init.d/lm_sensors start
After that - a sensors output should provide something like this:
eeprom-i2c-0-50
Adapter: SMBus Via Pro adapter at 0500
Algorithm: Non-I2C SMBus adapter
Memory type:            DDR SDRAM DIMM SPD
Memory size (MB):       512

vt1211-isa-6000
Adapter: ISA adapter
Algorithm: ISA algorithm
VCore1:    +2.31 V  (min =  +2.24 V, max =  +2.74 V)
+5V:       +4.71 V  (min =  +4.48 V, max =  +5.49 V)
+12V:     +11.78 V  (min = +10.77 V, max = +13.15 V)
+3.3V:     +3.28 V  (min =  +3.13 V, max =  +3.45 V)
Proc Temp: +56.5C  (limit =  +65C, hysteresis =  +60C)
|
|
Entered by smurphy on Saturday, 18 August 2007 @ 23:57:58
|
|
Linux on VIA Epia Hardware - Epia M10000 / Hush, # Hits: 96689
|
[ 11,464 bytes - text/plain ]
[ 116,896 bytes - application/x-perl ]
|
|
|
|
|
|
| | |
|
|
|
| |
|
The 2.6.2 kernel works well on the EPIA boards, but the patch is not as well developed as the 2.4 patch. First, start with a recent distribution - I used Fedora core 1. Download the 2.6.2 kernel from kernel.org. Next, download the 2.6.1 kernel patch. Don't worry - the 2.6.1 patch works with the 2.6.2 kernel source but we will have to create a symlink so that the patch finds the source tree. Next, extract and patch the kernel:
bash$ tar -xjf linux-2.6.2.tar.bz2
bash$ cd linux-2.6.2
bash$ gunzip -c ../via-v4l-1.4a-drm.patch.gz | patch -p1
If you have a more recent kernel - as the 2.6.11.5 - you don' t need to patch it - as all required patches are in the main kernel stream.
Next we have to configure the kernel. If you want, you can download this stripped down config file. Copy it to linux-2.6.2/.config and execute the make xconfig. The example config file is designed for a Nehemiah processor. If you are using an earlier processor then you must change the CPU type to C3. Then save and build.
bash$ make xconfig
bash$ make bzImage
bash$ make modules
bash$ su
Password:
bash# make modules_install
bash# make install
You should know how to modify your boot configuration to boot from the new kernel. Note that I have not been able to use the VESA framebuffer with the 2.6.2 kernel - the virtual terminals are blank. So boot in normal 80x25 mode. You will load the drivers manually (or edit your init scripts):
bash# /sbin/modprobe uhci-hcd
bash# /sbin/modprobe via82cxxx_audio
bash# /sbin/modprobe hid
bash# /sbin/modprobe agpgart
bash# /sbin/modprobe via_agp
bash# /sbin/modprobe via_v4l_drv
bash# /sbin/modprobe via
Also, you may need to edit your /etc/modules.conf file. The usb module has changed names, so you should have something like this:
alias usb-controller uhci-hcd
alias usb-controller1 uhci-hcd
|
|
Entered by smurphy on Saturday, 18 August 2007 @ 23:57:58
|
|
Linux on VIA Epia Hardware - Epia M10000 / Hush, # Hits: 96429
|
[ 26,939 bytes - application/octet-stream ]
[ 34,360 bytes - text/plain ]
[ 26,211 bytes - text/plain ]
|
|
|
|
|
|
| |
|
The symptoms are always the same:
- HD LED steadily one
- HD harddrive not accessible (connected on IDE 2)
- rest of system keeps running (network devices ok, graphics & sound ok)
The following error-message will usually occure:
hdc: DMA timeout error
hdc: dma timeout error: status=0xd0 { Busy }
ide: failed opcode was: unknown
hdc: DMA disabled
ide1: reset: success
hdc: drive_cmd: status=0x51 { DriveReady SeekComplete Error }
hdc: drive_cmd: error=0x04 { DriveStatusError }
ide: failed opcode was: 0xb0
This is mostly due to the harddisk overheating.
Having a Lex-System at home - the harddisk is mounted over a chip that gets rather hot - circled in red in the following Picture:

Sometimes the system won' t recover from such thing - thus hanging and not beeing able to actually recover to access-mode on the disk.
If you're not on site to actually get that issue fixed on hot days -
set the CPU speed to 400MHz, FSB to 66MHz and make sure the harddrive does not get too hot.
It seems - the smart-capability of the HD did deactivate the Harddisk to protect it from damage - due to overheating.
Here is what I run to actually stabilise it:
service smartd stop
chkconfig --del smartd
smartctl --smart=off --offlineauto=off --saveauto=on /dev/hdc
hdparm -d1 -Xudma2 /dev/hda
Another thing that was found on the Web - under
http://www.directron.com/faqviaas.html
I am having trouble with a system using a VIA chipset including a 686b southbridge and a Creative Sound Blaster Live card.
When the 686b southbridge was first released, motherboard manufacturers and VIA discovered a problem when trying to transfer files between the primary and the secondary IDE channels on motherboards using ultra-DMA, when a Sound Blaster Live was plugged in and drivers activated. This issue was caused because too much noise is transferred across the PCI bus by the Sound Blaster Live driver set. In an attempt to fix this issue, some motherboard manufacturers modified their BIOS. In some instances, these modifications to the BIOS caused a data corruption error even when not using a Sound Blaster Live. VIA released a patch which resolves this issue, which is incoroporated in the 4in1 drivers from the 4.31 version onwards. Motherboard manufacturers were advised to change the modifications made to thier BIOS to elimate the data corruption issue. If you are experiencing data corruption or lock up when transferring files between two IDE drives:
- Make sure you have the latest BIOS from your motherboard manufacturer
- Make sure you have the latest 4in1 drivers
- Make sure when you set up your system that you install the 4in1 drivers both before and after you install the SBL to make sure that the drivers see your SBL and install the correct patch. The patch will only install if the SBL is installed.
Discussions about these issues can be found:
a. Via-Arena
b. Symaptico Epia Forum
c. Tryphon
d. Kernel Maillinglist
|
|
Entered by smurphy on Sunday, 19 August 2007 @ 00:01:53
|
|
Linux on VIA Epia Hardware - CV860A / Lex Light, # Hits: 96387
|
[ 52,836 bytes - image/jpeg ]
|
|
|
|
|
|
|
| | |
|
|
|
| |
|
VIA VT8601A & VT82C686B EDEN on board CPU
Check the Manufacturer homepage details
CV860A Board Specs
|
|
Entered by smurphy on Sunday, 19 August 2007 @ 00:01:53
|
|
Linux on VIA Epia Hardware - CV860A / Lex Light, # Hits: 96041
|
[ 52,986 bytes - image/jpeg ]
|
|
|
|
|
|
| | |
|
|
|
| | |
|
|
|
| |
|
This is a known problem of the longhaul module on the SUSE system kernel. Make SUSE can not load the longhaul module - and you're safe.
For this - boot into the single-user mode - at the lilo-prompt - add the option:
init 1
Edit the file /etc/modules.conf or /etc/modprobe.conf and make sure the following line is in there:
alias longhaul off
If you want to remove the module completely - go to the /lib/modules directory - and issue the following command:
find . -name "longhaul*"
This will tell you where the longhaul module is located. Move it to a different location outside the kernel-version tree, or delete it - then you should be done. Reboot and enjoy...
|
|
Entered by smurphy on Saturday, 18 August 2007 @ 23:57:58
|
|
Linux on VIA Epia Hardware - Epia M10000 / Hush, # Hits: 95326
|
|
|
|
|
|
| |
|
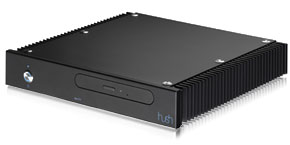 it looks really cool. Check out details at Hush Technologies.
Please note that the version with M10000 Epia Board is not manufactured any more. it looks really cool. Check out details at Hush Technologies.
Please note that the version with M10000 Epia Board is not manufactured any more.
|
|
Entered by smurphy on Saturday, 18 August 2007 @ 23:57:59
|
|
Linux on VIA Epia Hardware - Epia M10000 / Hush, # Hits: 95149
|
[ 9,274 bytes - image/jpeg ]
|
|
|
|
|
|
| |
|
These drivers are for different use
- via_agp is needed to get agp working
- via is needed to get drm working.
If only via is loaded, drm will work, but will fail to acquire AGP, and instead use only the PCI path which for the driver you are trying to use is available only for root since it tries to access registers not even available for an insecure dri client.
|
|
Entered by smurphy on Saturday, 18 August 2007 @ 23:57:58
|
|
Linux on VIA Epia Hardware - Epia M10000 / Hush, # Hits: 95082
|
|
|
|
|
|
| |
|
Usually, you would use the Flitedeck utility from VIA. However - this one is deprecated, and won't work on the new plattforms.
You can use a USB-Floppy drive now. Seems the BIOS has been improved - compared to the one on the M10000. Make sure the Write-Protection is removed: remove the jumper WP accordingly for the time to flash the BIOS.
Create a bootable dos-Disk - using Caldera-DOS 6.x here - put all required files on it. You can find some in www.bootdisk.com. Make sure you have a new version of the flash-tool (using version 829 here).
Boot from the floppy - and once done - type in the following command:
awfl829.exe BIOS.bin /py/sn/cd/cp
and you should be done. Note that this should work with future and old versions of BIOS's. Do not use the option /tiny on that one. Won't work.
|
|
Entered by smurphy on Wednesday, 17 August 2005 @ 00:19:12
|
|
Linux on VIA Epia Hardware - Epia SP8000E, # Hits: 92848
|
[ 66,291 bytes - image/png ]
|
|
|
|
|
|
|
| |
|
In the module-configuration file for lm_sensors - e.g. under
Mandrake 10.1 /etc/sysconfig/lm_sensors
Gentoo /etc/conf.d/lm_sensors
make sure the following modules are configured to be loaded. You'll require lm_sensors-2.9.1 at least for the display of sensor informations to be correct.
MODULE_0=i2c-viapro
MODULE_1=i2c-isa
MODULE_2=eeprom
MODULE_3=vt1211
The /etc/sensors.conf file has to be as in the attached sensors.conf file.
|
|
Entered by smurphy on Friday, 02 September 2005 @ 23:28:10
|
|
Linux on VIA Epia Hardware - Epia SP8000E, # Hits: 91670
|
[ 6,829 bytes - plain/text ]
|
|
|
|
|
|
| | |
|
|
|
| |
|
The Epia SP8000E uses a 800MHz Nemiah core CPU. By loading the longhaul module - you can throttle the CPU (Tested with 2.6.11.6). Please note that there are many patches to the cpufrequency control - and many are unstable. If your System locks-Hard - you have a bad implementation :)
So - all you need to do is enable the cpu frequency scaling by loading the longhaul module and some governors:
 modprobe longhaul
 modprobe cpufreq_powersave
Check using the dmesg command to see if it loaded correctly.
If this works - make sure the longhaul module gets loaded at every boot. For this - just add longhaul and cpufreq_powersave into the /etc/modprobe.preload file.
Using longhaul - make sure your kernel was configured with the userspace-governor enabled by default - then change to:
root # cd /sys/devices/system/cpu/cpu0/cpufreq/
cpufreq # ls
affected_ cpuinfo_cur_freq
cpuinfo_max_freq
cpuinfo_min_freq
scaling_available_frequencies
scaling_available_governors
scaling_cur_freq
scaling_driver
scaling_governor
scaling_max_freq
scaling_min_freq
scaling_setspeed
cpufreq # cat scaling_cur_freq
798000
cpufreq # cat scaling_available_frequencies
532000 598000 731000 798000 665000
cpufreq # echo 532000 > scaling_setspeed
cpufreq # cat scaling_cur_freq
532000
With the userspace governor activated
cpufreq # cat scaling_available_governors
userspace
The System will set the speed up to 800MHz in this special case - if required - and when idle again - go down with the frequency. In short - it will dynamically monitor the system load and regulate the CPU Frequency accordingly.
If you want to stick the system into powersave mode - load the cpufreq_powersave.ko module
cpufreq # modprobe cpufreq_powersave
cpufreq # cat scaling_available_governors
powersave userspace
echo powersave > scaling_governor
This will make the CPU-Frequency sticky at the lowest speed your CPU can run at - and hopefully lower the overall system power consumption and heat dissipation
This is what I have added to the system's /etc/rc.local file on my server - so it gets activated at every boot.
sleep 60
echo powersave > /sys/devices/system/cpu/cpu0/cpufreq/scaling_governor
For those having a RedHat based system - you can use the following startup-script cpufreq.tar.gz. 2 Files are in there:
/etc/init.d/cpufreq
/etc/sysconfig/cpufreq
Edit the /etc/sysconfig/cpufreq and set your preferences - then:
init.d # ./cpufreq status
CPU Frequency Scaling deactivated !
stargate init.d # ./cpufreq start
Loading modules: longhaul, cpufreq_powersave
Setting gowernor to: powersave
Actual powerstatus: longhaul(powersave) @ 399000KHz
If this works - register it to the underlaying system issuing:
chkconfig --add cpufreq
chkconfig --list cpufreq
cpufreq         0:off   1:off   2:on    3:on    4:on    5:on    6:off
This will start the script at every startup.
Note that you can start the exact order by adapting the
chkconfig-line in the init.d/cpufreq script itself. It is set to be started after udev and iptables startup.
# chkconfig: 2345 05 90
If chkconfig does not exist on your system - you can of course create symlinks - as back in old times.
|
|
Entered by smurphy on Friday, 02 September 2005 @ 23:33:37
|
|
Linux on VIA Epia Hardware - Epia SP8000E, # Hits: 91559
|
[ 1,014 bytes - application/x-gzip ]
|
|
|
|
|
|
| |
|
Check the following files:
|
|
Entered by smurphy on Thursday, 18 August 2005 @ 20:05:20
|
|
Linux on VIA Epia Hardware - Epia SP8000E, # Hits: 91522
|
[ 4,017 bytes - application/octet-stream ]
|
|
|
|
|
|
| |
|
Here it is:
|
|
Entered by smurphy on Friday, 19 August 2005 @ 21:28:37
|
|
Linux on VIA Epia Hardware - Epia SP8000E, # Hits: 91507
|
[ 70,327 bytes - image/jpeg ]
|
|
|
|
|
|
| | |
|
|
|
| |
|
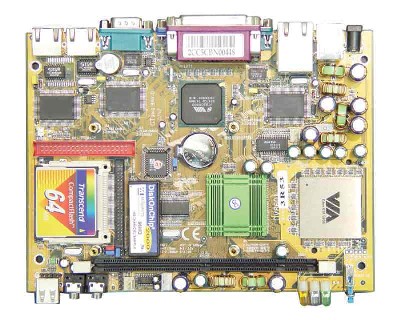
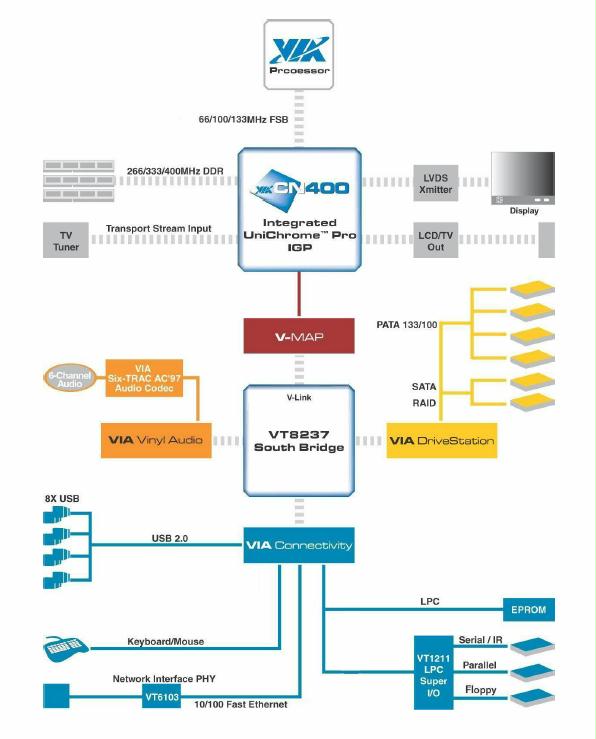
The VIA CN400 Chipset is designed to enable high quality digital video-streaming and DVD Playback in fanless operations mode.
Features are a Embedded UniChrome PRO 2D/3D Mpege-2 Decoder/MPEG-4 Accelerator, DDR400 support, motion compensation and duo-view support. Also - USB 2.0, Serial-ATA, 10/100 MBIt LAN and ATA133/100 IDE.
The Overall Layout looks like this:
|
|
Entered by smurphy on Friday, 02 September 2005 @ 21:12:12
|
|
Linux on VIA Epia Hardware - Epia SP8000E, # Hits: 91252
|
[ 49,201 bytes - image/jpeg ]
|
|
|
|
|
|
| | |
|
|
|
| |
|
I would have loved someone to answer me that question before I bought that case. The Short answer is: No
The case is nice - though the CPU temperature is going up to 70/80C. That might be OK for the CPU and motherboard - however - we have to take into account the other components in the system. The Harddisk or CDRom Drives will suffer from it. Especially harddisks start to fail when the temperature is over 60C - so at least the harddrive will require a FAN to operate.
Solution: Instead of the location for the 2.5" harddrive - put a 50mm FAN on the side which blows the air out of the case - you'll have to make a big hole on the side though. This keeps the System temperature below 45C which is sustainable for all the hardware inside.
|
|
Entered by smurphy on Wednesday, 21 September 2005 @ 23:31:28
|
|
Linux on VIA Epia Hardware - Epia SP8000E, # Hits: 91021
|
|
|
|
|
|
| | |
|
|
|
|
|