New Server/NAS setup
The IMB-2000 motherboard finally arrived last week, so I ordered the missing parts to finalize the system buildup.
So far, this little system looks really very promising. The power footprint is so low compared to my other systems, I wonder why I didn't fell for it earlier.
Hardware setup
- Motherboard: IMB-V2000 mini-itx motherboard, MB-V2000P(V2748, 2.9GHz, 35-54W)
- RAM: D4S16GB 2933-21 ECC 1Rx8 Micron E KVR
- OS disk: Samsung NVMe SSD 500GB 2.6/3.1G 980
- Data disk: Samsung NVMe SSD 1TB 3.0/3.5G 980
- Storage array: 2x10Tb Seag 10TB ST10000NE0008 7200 SA3 IronWolf Pro
- Enclosure: Inter-Tech 1.5U-1528L
- PSU: Inter-Tech 88882139 PSU IPC Flex ATX AP mfatx25p8, 250W
See the entire pack here https://www.solsys.org/bin.php?bin=get&bin_id=1152
Note that for the NVMe SSD disks I chose to take the simple 980 model (Not PRO, Not EVO or whatever). While checking the specs, the PRO, EVO etc. all use TLC chips, while the regular model 980 uses the MLC type which is supposed to last longer!
Note 2 that I opted for a NVMe SSD using a PCI Express 3.0 x4 to PCIe NVMe adapter card instead of using 2 S-ATA 2.5" disk in Raid-1 array for data. In almost 10 years I use SSD drives, I never had an outage. The Storage array however will be setup using a Raid-1 mirror array
System benchmarks
SYSTEM INFORMATION:

  PROCESSOR:          AMD Ryzen Embedded V2748 @ 2.90GHz
    Core Count:       8
    Thread Count:     16
    Extensions:       SSE 4.2 + AVX2 + AVX + RDRAND + FSGSBASE
    Cache Size:       8 MB
    Microcode:        0x8600103
    Core Family:      Zen 2
    Scaling Driver:   acpi-cpufreq ondemand (Boost: Enabled)

  GRAPHICS:           AMD Renoir

  MOTHERBOARD:        ASRock IMB-V2000
    BIOS Version:     L0.15
    Chipset:          AMD Renoir Root Complex
    Network:          Realtek RTL8125 2.5GbE + Realtek RTL8111/8168/8411

  MEMORY:             2 x 16384 MB DDR4-2933MT/s Kingston

  DISK:               1000GB Samsung SSD 980 1TB
                      + Samsung SSD 980 500GB
                      + 2 x 10001GB Seagate ST10000NE0008-2P
    File-System:      ext4
    Mount Options:    relatime rw stripe=32
    Disk Scheduler:   NONE
    Disk Details:     Block Size: 4096
Here some pictures on the mount:

The absolute best part is the power usage of that setup. During a mysql benchmark (Ok, mostly disks etc.) the power usage is at barely 27W:
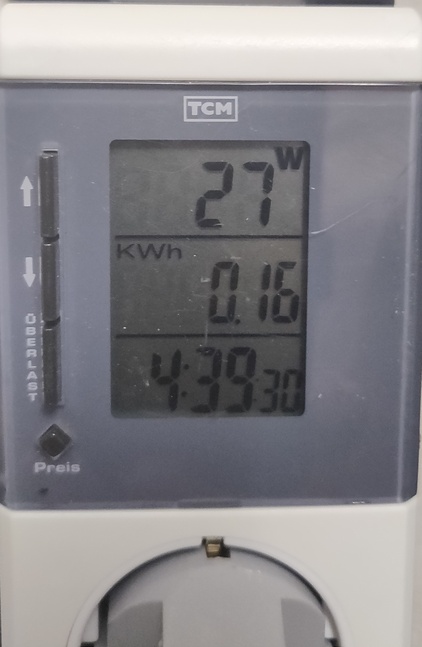
During parallel CPU stress-test, the Powermeter went up to 39W so far! That is absolutely amazing!!!
Installing the OS
Ubuntu 20.04.2 LTS was the chosen candidate. Note that because the motherboard is brand-new, and the CPU also not really found in the wild, using the hwe kernel has proven to work better.
Using the plain install had the 2.5Gbps ethernet port to not run, and sensors data was barely available.
OS and Data disks will run ext4fs filesystem. The Storage array will be done using btrfs/raid1. The data-deduplication is a quite nice feature.
Cleaning up the OS
As the target of this system is defined, all the "versatility" of ubuntu is not required.
As a admin of many systems, I tend keep things as simple as possible. This also means to remove everything that is not needed and use the pessimistic approach.
By default, I also don't like snap nor packagekit.
-
snap
~# apt purge snapd
~# apt autoremove
-
Unattended upgrades. I do these using my own scripts. The fact that I put some special flags on /tmp and /var/tmp (noexec, nosuid etc.) prevents the post/pre-install scripts to actually be executed and cause havoc.
~# apt purge unattended-upgrades
-
Purge the cloud-init tools. Don't know why these are here.
~# apt purge cloud-guest-utils cloud-init cloud-initramfs-copymods cloud-initramfs-dyn-netconf
-
at - cron is running. No need for at
~# apt purge at
-
Last thing they install is packagekit. Why? On a server-system?
~# apt purge packagekit
-
Various stuff I don't like
~# apt purge command-not-found python3-commandnotfound
Installing Kubernetes
For ease of use and for resource purposes, I decided to install k3s (Rancher's implementation of Kubernetes). You also find that install to suite for Raspberry PI's.
Only in this case it will run on x86 based platform.
You may want to check the requirements page first.
Note that because I do a 1 node only install, most of the firewall configuration settings won't apply (Except for the day I want to add a node).
The interesting part will be the install options. For my setup, I will only need a few, notably I will set as below code snippet:
export K3S_KUBECONFIG_MODE="640"
export K3S_NODE_NAME="master"
export INSTALL_K3S_EXEC=" --no-deploy servicelb --no-deploy traefik"
curl -sfL https://get.k3s.io | sh -
Note that this needs to be run as root. I also don't want a loadbalancer to be installed nor a ingress-handler.
Once the installation done, check the setup with:
$ systemctl status k3s
=> k3s.service - Lightweight Kubernetes
     Loaded: loaded (/etc/systemd/system/k3s.service; enabled; vendor preset: enabled)
     Active: active (running) since Sat 2021-05-08 15:41:26 CEST; 14min ago
       Docs: https://k3s.io
    Process: 794 ExecStartPre=/sbin/modprobe br_netfilter (code=exited, status=0/SUCCESS)
    Process: 824 ExecStartPre=/sbin/modprobe overlay (code=exited, status=0/SUCCESS)
   Main PID: 825 (k3s-server)
      Tasks: 319
     Memory: 1.1G
     CGroup: /system.slice/k3s.service
                 825 /usr/local/bin/k3s server
                1173 containerd
... Cut ...
and check the running k3s cluster with:
prodadm@gateway:~/k3s/installation$ k get nodes -A -o wide
NAME     STATUS   ROLES                  AGE    VERSION        INTERNAL-IP   EXTERNAL-IP   OS-IMAGE             KERNEL-VERSION     CONTAINER-RUNTIME
master   Ready    control-plane,master   2d3h   v1.20.6+k3s1   192.168.5.1           Ubuntu 20.04.2 LTS   5.8.0-50-generic   containerd://1.4.4-k3s1
prodadm@gateway:~/k3s/installation$ k get pods -n kube-system  -o wide
NAME                                      READY   STATUS    RESTARTS   AGE    IP            NODE     NOMINATED NODE   READINESS GATES
coredns-854c77959c-swd97                  1/1     Running   4          2d3h   10.42.0.108   master
local-path-provisioner-5ff76fc89d-8wjmz   1/1     Running   8          2d3h   10.42.0.121   master
metrics-server-86cbb8457f-tw9rv           1/1     Running   4          2d3h   10.42.0.117   master
kube-state-metrics-79cff5689d-bslph       1/1     Running   1          22h    10.42.0.122   master
If all is running, you're good to install the loadbalancer.
Installing the Load Balancer: metallb
The reason I do not make an automated LB installation, is that I will use 2 network interfaces, hence need to provide the LB some details on which subnets he can serve.
kubectl apply -f https://raw.githubusercontent.com/metallb/metallb/v0.9.6/manifests/namespace.yaml
kubectl apply -f https://raw.githubusercontent.com/metallb/metallb/v0.9.6/manifests/metallb.yaml
kubectl create secret generic -n metallb-system memberlist --from-literal=secretkey="$(openssl rand -base64 128)"
The last line needs to be create only on first installation.
Once that created, setup the configuration with the following content
apiVersion: v1
kind: ConfigMap
metadata:
  namespace: metallb-system
  name: config
data:
  config: |
    address-pools:
    - name: default
      protocol: layer2
      addresses:
      - 192.168.0.1/32
      - 10.0.0.1-10.0.0.10
and apply it with
kubectl apply -f metallb-config.yaml
Check the setup with the below example
checking LB functions
I tend to install a small image from kennethreitz/httpbin which is an excellent tool to troubleshoot various header issues with ingress setups etc.
Create on file with the following content:
---
apiVersion: apps/v1
kind: Deployment
metadata:
  labels:
    app: httpbin
  name: httpbin
  namespace: trouble
spec:
  selector:
    matchLabels:
      app: httpbin
  template:
    metadata:
      labels:
        app: httpbin
    spec:
      containers:
      - image: kennethreitz/httpbin
        name: httpbin
---
apiVersion: v1
kind: Service
metadata:
  name: svc-httpbin
  namespace: trouble
  labels:
    app: httpbin
    component: httpbin
spec:
  selector:
    app: httpbin
    component: httpbin
  ports:
  - port: 80
    protocol: TCP
    targetPort: 80
and setup the pod and service with the following commands:
kubectl create ns trouble
kubectl apply -f trouble.yaml
Check the pods is deployed correctly with:
prodadm@gateway:~/k3s/troubleshooting$ k get pods -n trouble -o wide
NAME                       READY   STATUS    RESTARTS   AGE    IP            NODE     NOMINATED NODE   READINESS GATES
httpbin-849ccf48fc-cqzdc   1/1     Running   4          2d2h   10.42.0.109   master
and verify if the app is working. Go to the Node the pod has been deployed on (in this case it is the master), and execute:
prodadm@gateway:~/k3s/troubleshooting$ curl http://10.42.0.109/headers
{
  "headers": {
    "Accept": "*/*",
    "Host": "10.42.0.109",
    "User-Agent": "curl/7.68.0"
  }
}
Now check the service, and from the master, perform the same call using the service Ip Address:
prodadm@gateway:~/k3s/troubleshooting$ k get svc -n trouble -o wide
NAME          TYPE        CLUSTER-IP     EXTERNAL-IP   PORT(S)   AGE    SELECTOR
svc-httpbin   ClusterIP   10.43.107.51           80/TCP    2d2h   app=httpbin
prodadm@gateway:~/k3s/troubleshooting$ curl http://10.43.107.51/headers
{
  "headers": {
    "Accept": "*/*",
    "Host": "10.43.107.51",
    "User-Agent": "curl/7.68.0"
  }
}
It should return exactly the same. If that is the case, you're good to install the ingress handler.
Install Traefik
For traefik, we'll use helm v3 (please install it following the official installation instructions).
Once helm installed, pull the traefik repo with:
helm repo add traefik  https://helm.traefik.io/traefik
helm repo update
I'm using a special installation as I will deploy 2 instances, one on each interface IP! in loadbalancer mode.
For this, I create 2 namespaces: traefik-dmz and traefik-lan with:
kubectl create ns traefik-dmz
kubectl create ns traefik-lan
because I use powerdns and want traefik to handle certificates through the PDNS API, I create 2 secrets (one for each traefik instance) so they can communicate with the DNS Server, and an associated configuration.
# Filename: traefik-secret.yaml
---
apiVersion: v1
kind: Secret
metadata:
  name: pdns-api-credentials
  namespace: traefik-dmz
type: Opaque
data:
  api-key: RWVsb29kbzFXZUNoYWlEOA==
  api-url: aHR0cDovLzE5Mi4xNjguMC4xOjgwODE=
Note the above secrets have been anonymized, means randomized.
# filename: traefik-config.yaml
apiVersion: v1
kind: ConfigMap
metadata:
  name: traefik-config
  namespace: traefik-dmz
data:
  traefik-config.yaml: |
    http:
      middlewares:
        headers-default:
          headers:
            sslRedirect: true
            browserXssFilter: true
            contentTypeNosniff: true
            forceSTSHeader: true
            stsIncludeSubdomains: true
            stsPreload: true
            stsSeconds: 15552000
            customFrameOptionsValue: SAMEORIGIN
    api:
      dashboard: true

    log:
      level: "WARNING"

    entryPoints:
      http:
        address: ":80"
      https:
        address: ":443"
      ncloud:
        address: ":9443"

    certificatesResolvers:
      letsencrypt:
        acme:
          email: email@domain.tpl
          # Remove for production!
          caServer: https://acme-staging-v02.api.letsencrypt.org/directory
          storage: acme.json
          dnsChallenge:
            provider: "pdns"
            delayBeforeCheck: 120
            resolvers: ["1.1.1.1","8.8.8.8"]
            disablePropagationCheck: true
I use the same file for both (traefik-dmz|lan) but change the namespace or else it won't work.
Apply for each namespace using the following command:
kubectl apply -f traefik-config.yaml -f traefik-secret.yaml
Once that is done, we create the "values file for the helm installer. Below the example for the dmz-traefik:
spec:
  loadBalancerIP: 192.168.0.1
additionalArguments:
  - --accesslog
  # always redirect from http to https
  # do not use "websecure" here because it will not point to 443 but to 8443
  - --entrypoints.web.http.redirections.entrypoint.to=:443
  - --entrypoints.web.http.redirections.entrypoint.scheme=https
  - --metrics.prometheus
  - --providers.kubernetesingress.ingressclass=traefik-dmz
env:
  - name: PDNS_API_KEY
    valueFrom:
      secretKeyRef:
        key: api-key
        name: pdns-api-credentials
  - name: PDNS_API_URL
    valueFrom:
      secretKeyRef:
        key: api-url
        name: pdns-api-credentials
persistence:
  enabled: true
  path: /certs
  size: 128Mi
volumes:
  - mountPath: /data
    name: traefik-config
    type: configMap
and execute the installation with:
helm install --namespace traefik-dmz traefik-dmz traefik/traefik --values traefik-chart-values.yaml
Fine tuning traefik
Traefik will not be installed as wanted from the start.
because I want the public IP's to go through, I need to change the externalTrafficPolicy to Local, and amke sure the LoadbalancerIP is correctly set.
So - edit each of the deployments with:
kubectl edit svc traefik-dmz -n traefik-dmz
Search for externalTrafficPolicy and change from Cluster to Local, also that the LoadbalancerIP is set correctly. it should look like this in the end:
prodadm@gateway:~/k3s/installation/dmz$ k get svc -n traefik-dmz
NAME          TYPE           CLUSTER-IP     EXTERNAL-IP   PORT(S)                      AGE
traefik-dmz   LoadBalancer   10.43.20.226   192.168.0.1   80:32231/TCP,443:31949/TCP   22h
prodadm@gateway:~/k3s/installation/dmz$ k get svc -n traefik-lan
NAME          TYPE           CLUSTER-IP      EXTERNAL-IP   PORT(S)                      AGE
traefik-lan   LoadBalancer   10.43.113.199   10.0.0.1    80:31656/TCP,443:32513/TCP   22h
From now on, you can define which traefik instance will provide the ingress route by adding the correct ingress class. For example for my dmz setup:
  annotations:
    kubernetes.io/ingress.class: "traefik-dmz"
|